In this step of the wizard, the assignment between the basic modules (e.g. postal code) and the first and, if available, the assignments to the other higher planning levels (e.g. AD areas and regions) are defined in further steps.
After initializing the assignments you can either click directly on Finish to insert the territory structure on the opened sheet or click on Next to add more information.
Three selection options are available:
If there is no allocation in the form of a table between the layers, the first point can remain clicked and be clicked on Next or Complete.
If an assignment exists, the second point is clicked and then further specification of the data can be made in the area of Data.
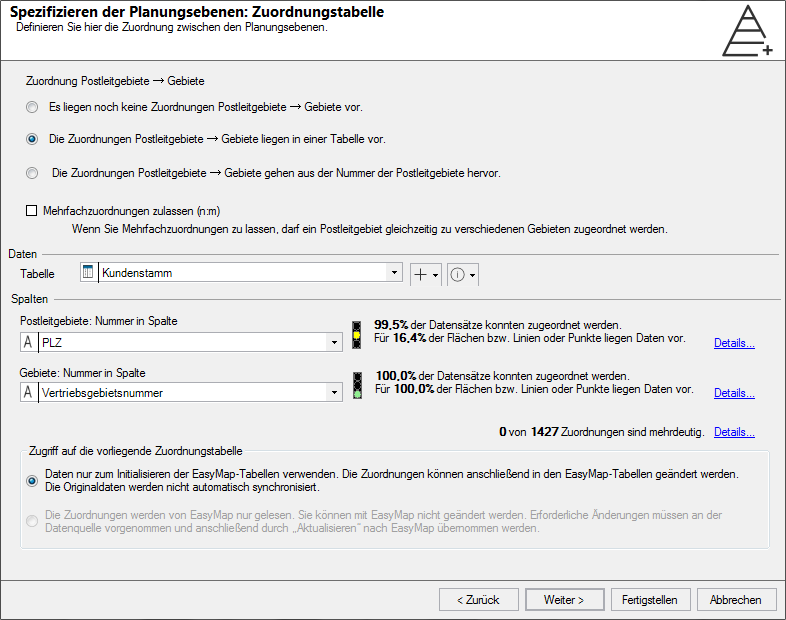
In the Data section, you can address a table directly if you have already imported or linked it in EasyMap. If the data is only used to initialize the territory structure and is no longer required, you can also load the data temporarily. The procedure is the same as described under Loading or Linking. We recommend this procedure if the data is really only used for initialization, otherwise the data will diverge after assignment changes and the original data will no longer be up-to-date.
If you have a table that contains assignments in intervals or enumerations, proceed as follows:
In this case, the number can be derived from the numbers of the basic modules - is therefore a component of this number.
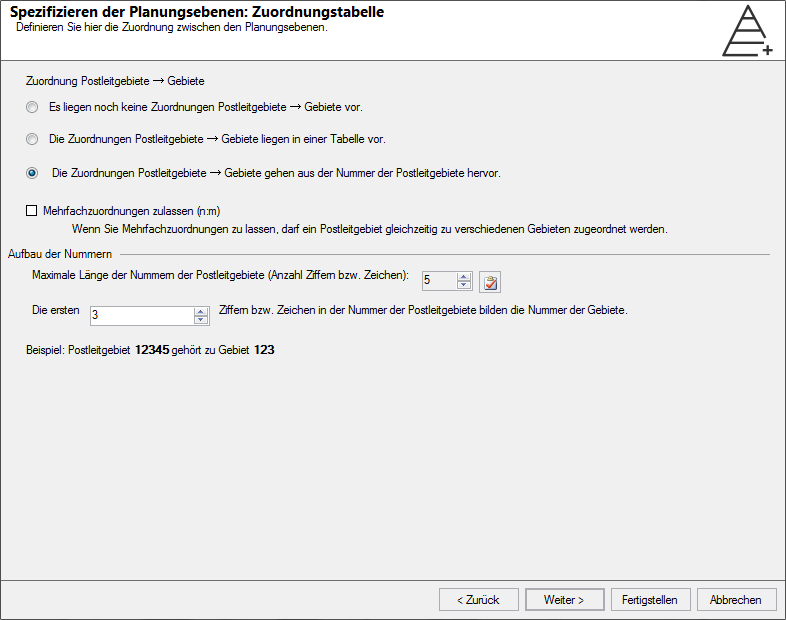
First, the maximum length of the current number key is displayed. In the lower part you can specify how many of the digits should be used for your key. The first digits for the key are always used.
After specifying the maximum length of the number, you can switch off the length check performed by EasyMap. The length control is intended to prevent number lengths from being specified that do not match your data. Conversely, it may be necessary that the number length read out is too short - in this case the length control must be switched off and the number length manually adjusted.
There are numerous consequences associated with the determination that the numbers of the bricks indicate the assignment. These are explained in detail in
If you allow multiple assignments, a brick may be assigned to several territories. The number of ambiguous assignments you have in your data is shown below the column selection.
This attitude has far-reaching consequences and should therefore be well considered. Later this choice can be changed in the properties to the area level. As a result, EasyMap will create the tables in a different form. In the Basic data none Assignment to superior territories can be displayed, since this does not have to be unique. Instead, the assignment table from the structural data must be used. Here you can add new assignments in the case of multiple assignments.
You can display the list of areas that have been assigned more than once
EasyMap supports two ways to combine assignments and numbers.
You define the way in which assignments and numbers are linked when you create a new territory structure on the Specify planning levels page: Assignment table fixed.
If your territory structure only comprises one level, this question does not arise. The numbers of the coarsest level are automatically always free numbers.
The way assignments and numbers are linked has some consequences for the later possibilities. Restrictions and advantages are listed in the subchapters.
General rule : Free numbers offer more flexibility, but hierarchical numbers rather reflect the structure.
The numbers of a level can be selected completely freely and have nothing to do with the assignment to superordinate areas.
Advantages:
Disadvantages:
The numbers in no way reflect the hierarchical structure. Areas belonging to the same higher-level area can also have completely different numbers.
The numbers are closely linked to the assignment to a higher level. Each number contains the assignment to the superior level as part of the number. By shortening the number by a certain number of characters, the assignment to the superordinate level is implicitly made. EasyMap always shortens the number on the right side, i.e. the front part of the number contains the assignment.
EasyMap constantly monitors the consistency of numbers and assignments and performs the following automatic adjustments:
Advantages:
Disadvantages and limitations:
EasyMap offers you the possibility to convert hierarchically structured keys into free numbers so that the disadvantages and limitations of hierarchical keys are eliminated for further planning or optimization.
To change the numbering system, right-click on a layer in Control window territory organization and open Properties. Under the area General change the assignment from Hierarchical to Free.
Please note at this point that the changes cannot be undone afterwards. It is therefore not possible to convert free numbers into a hierarchical key.
In EasyMap, the assignment of territories to territory locations is also realized using an explicit assignment table.
In this context, the permitted multiple assignment has even more far-reaching consequences: In this case, on the one hand a territory may be assigned to several territory locations, and on the other hand several territories may also be assigned to a territory location.
In all cases it is also permitted that a territory location is not assigned to any territory at all, i.e. is still available.