Select, move and align objects
selections are used to select any content components of an easymap workbook for subsequent editing. For example, you first select a legend element and then delete it, or you select a postal routing area and then color it.
Objects and layers on the map or in the control window content are always aligned in easymap by drag&drop move and alignment. Additionally, easymap offers further commands to align objects with each other or to align them within the map.
Select objects
There are various ways of selecting objects for further processing, such as
- by clicking on the map or
- by clicking inside the control window Content.
- If a map is linked to a table, map contents can also be marked indirectly by clicking on the linked table rows. To do this, you must click in the data area of the table, not on the left margin.
Note: If an object is displayed in different windows (e.g. legend elements in the map window and in the control window content) it does not matter in which window you select the object. However, some objects will be displayed by easymap only in the control window content (e.g. the map layers), some only in the map window (e.g. the area texts) and some only in the table window (e.g. the data).
Selecting Objects in the Map Window
In the map window all visible objects can be selected by default. The various commands for marking can be found in the menu Edit > Mark. If you have chosen the command Mark single and several objects are on top of each other at the clicked position on the map, easymap will mark the one above. The arrangement of the layers can be changed in the control window content.

|
Mark single |
With a click in the map window you can mark individual areas. If you hold down the Ctrl key while marking, the marking will be extended. The single marking is the basic state of easymap. |

|
Nearby lying | With a click in the map window you can mark all objects that are near the clicked point. In contrast to "Select individually", a click does not select exactly one object, but all objects in the selection layer that are close to the click position. This marking option has the same effect as "Mark rectangle" with a very small rectangle. |

|
radius |
You can use an action to select many elements of the current selection level. Please make sure that the layer of areas (or texts, symbols, etc.) in the selection box is set as the active layer. You have 2 options for selecting all objects in a circle:
|

|
Rectangle |
You can use an action to select many elements of the current selection level. Please make sure that the layer of areas (or texts, symbols, etc.) in the selection box is set as the active layer. Drawing a rectangle with the mouse Hold down the mouse button and draw a rectangle. As you drag, the current rectangle is displayed. You can see the kilometre extent in the lower right corner of the window. When you release the mouse, all elements in the current selection layer that lie in this rectangle are selected. |

|
Freehand |
With the marking variant free hand you can define the edge of the marking by setting some corner points. This defines a polygon ("polygon") within which the elements are to be marked. You can use an action to select many elements of the current selection level. Please make sure that the layer of areas (or texts, symbols, etc.) in the selection box is set as the active layer. Defining a polygon with the mouse Click in the map window to add corner points. You can see how a boundary line gradually emerges. To complete the polygon, either click on the starting point again, or double-click in the map window to set this point as the last corner point and then automatically complete the polygon. |
Here it is possible to define a marking according to the structures available in the map. A window will open with the same selection as the command clip map > by list. Only layers present in the map can be selected for marking.
The marking level
When you select items on the map, the corresponding selection level is displayed within the toolbar. You can fix this if, for example, you want to edit many elements of the same map layer one after the other (for example, moving area texts). To fix a selection layer, click the button with the lock to the right of the selection box for the selection layer.
- Marking / Nearby
- Mark / Radius
- Mark / Rectangle
- Mark / Freehand
- Mark / By list...
- Mark / Transfer to ...
- Select / All
- Mark / Invert
- select an element from another layer of the same map,
- to select an element from another map,
- Select an object that does not belong to the contents of a map layer,
- to a different leaf,
- in the table of contents, click the contents of a sheet or group, or a map layer.
You can also change the contents of the selection box for the selection level directly. In order to keep the selection options clear, easymap office offers only the "obvious" selection options here (e.g. all map layers of the map you are currently working on). If the selection box does not offer the option you are looking for in a certain situation, simply click on an object in the map that belongs to the desired selection level (make sure that the lock next to the selection box is open first!) Or select the selection level by clicking in the table of contents.
Select several objects at the same time
If you want to select several objects at the same time with the selection mode Select Single , hold down the Ctrl-Key and then click on the desired objects one after the other with the left mouse button. As soon as a first object is selected, easymap will automatically select further objects only if they are "compatible" (e.g. if they are from the same map layer).
In contrast, design elements such as texts and legends on the sheet can be marked and aligned at the same time, but not simultaneously with elements from map layers. It is not possible to select objects on different sheets.
Select when objects cover each other
If I cover objects in the map and you want to select the underlying objects, you have two options:
- Click with the right mouse button on the place and execute the command Mark other object in the context menu.
- Fix the marking level. The Fix layer function is useful, for example, if you want to edit many elements of the same map layer one after the other (e.g. move area texts). If you have fixed the correct selection layer, it is impossible for unwanted objects to be selected accidentally. To lock a marker layer, click the lock button to the right of the Marker layer selection box.

|
Selection box for the Marking level (The lock is closed; the level is thus fixed.) |
Transfer Selection to
With the command Mark > Transfer to... you have the possibility to transfer the existing mark to other layers. For example, postal code areas can be marked in order to find out which districts lie within the marked area.
In particular, it is possible:
- Transfer the selection of selected elements from one layer to elements of another layer.
- Transfer the selection of an object, e.g. a geometric shape, to elements of a plane.
If the source and the target of the transfer are two-dimensional objects (e.g. marker transferred from one surface plane to another), the global setting Marking mode is used to decide when an area in the target plane is "in".
- With the Continue (central point) option, an object is included in the selection if the central point of this object was captured with the selection tool.
- With the Touch option, it is sufficient for the object to be touched by the selection tool to be included in the selection.
- Completely Contained causes the object to have to be completely captured by the selection tool for it to be selected.
In all other cases, an area of the target plane is marked when it touches the existing marking.
Shifting objects
Objects are always moved in easymap by Drag&Drop. For example, you can move objects within a map (e.g. labels). You can also move objects that are not part of a map on the sheet. Freehand graphic objects and legend elements normally belong to the contents of the sheet (unless , You have made such objects the contents of a map by pressing the ctrl key when inserting them). The assignment of an object to the contents of a page, a group or a map can be changed at any time. To do this, move the object in question via Drag&Drop in the control window Content.
Note: easymap is forced to change the position of the object if the position would be invalid after the changed assignment to sheet, group or map.
Moving Objects and Displaying the Original Position
Various analyses and text objects offer the option of displaying the original position of the object when it is moved from its original position. The original position is visualized by a line.
To display the original position of a moved object, select it on the map.
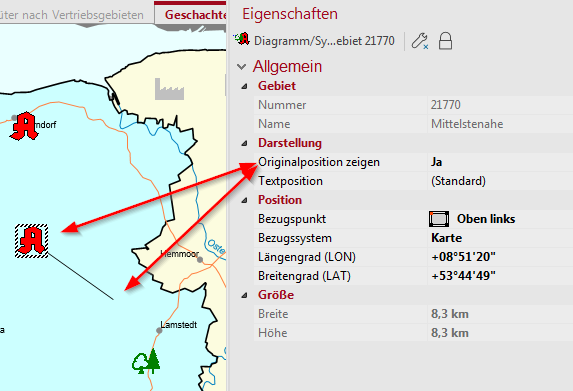
- Open the Properties of the object, either via the context menu of the right mouse button or by double-clicking with the left mouse button.
- Under General > Display change the property Show original position to Yes.
- For text objects you will find the Display original position under Display > Position.
Note: To display the original position for all objects of a layer, select all objects (of the analysis or text layer) in the map (Ctrl+A) and open the Properties of the selected objects from the context menu. Now you can change the properties for all.
In analyses
You can change the style of the position display in Properties of the analysis level in the control window Contents. Here you can set in the area Details the Original position display the style and color. E.g. you can display a dashed line or mark the beginning or the end of the line with an arrowhead.
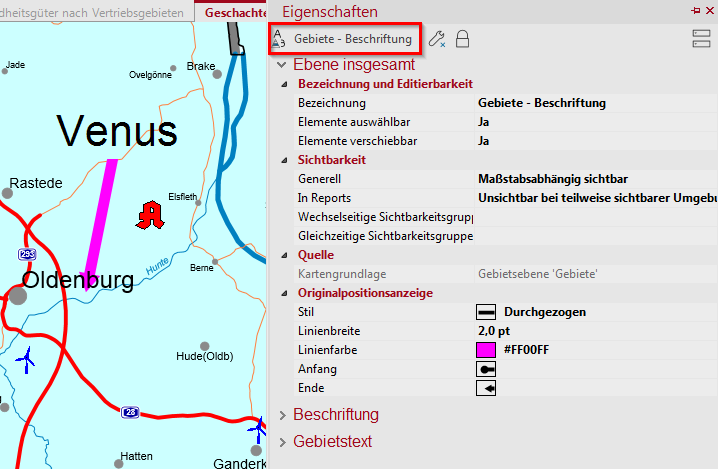
In text layers
To change the style and color, first open the PropertiesLayer of ... - Marking. In the area plane total you can change the original position display. Also here the line to the original position becomes visible after moving the text.
Align
Basically, objects in easymap can be aligned via drag&drop. In the context menu for individual object levels in the control window content or for corresponding objects in the map, you can also call the command align with subcommands and align the respective object accordingly.
A single object can only be aligned horizontally or vertically within a sheet or map. If several objects are selected, they can also be aligned with each other. With Align top the objects are aligned with the topmost object, with Align left with the object that is furthest to the left, and so on.
Set anchor points for objects
You can use anchor points to fix objects in the map at a specific point. In the case of automatic resizing, the objects then only expand in a certain direction. In this way, you prevent an object from getting out of the visibility area of the map (for example, with reports).
To set the anchor points, open the properties of the object. In the area General you will find the settings for Anchor point under Position. By default, the anchor point is at the top left of the object, so when you resize the object, it expands to the right and down. If you select bottom left as the anchor point, the object can only expand upwards to the right or downwards to the left if the size is reduced. The position of the lower left corner remains unchanged.
